
How to Print in Multiple Colors on a Creality K2 with the CFS
Step-by-step multi-color printing on Creality K2 series printers with the CFS: loading spools, RFID vs ordinary filament, the filament screen, slicing and mapping, and automatic refill, based on Creality's wiki.
Disclosure: This page may contain affiliate links. They do not influence our editorial conclusions. Read the disclosure.
Our pick
- See price at Creality
Top pick
Creality
3D printer maker behind the Ender, K1, K2 and K3 FDM printers, Halot resin printers and CR-Scan 3D scanners, plus filament and Creality Cloud software.
What this guide covers
Multi-color printing is the main reason many people buy a Creality K2 series printer with the CFS, Creality's multi-spool filament system. The hardware does most of the work, but there are a few steps where a wrong setting gives you a single-color print, a slow print or a failed color change. This guide walks through the whole process in order, from loading spools to slicing and printing, based on Creality's official K2 Flagship Series wiki.
The steps apply to the K2 series printers covered by that wiki section, including the K2, K2 Pro and K2 Plus. Menu names below are the ones shown in Creality's screenshots, so the labels on your screen should match.
If you haven't picked a printer yet, our best Creality 3D printers for beginners roundup compares the K2 with Creality's entry-level models.
Step 1: Load filament into the CFS
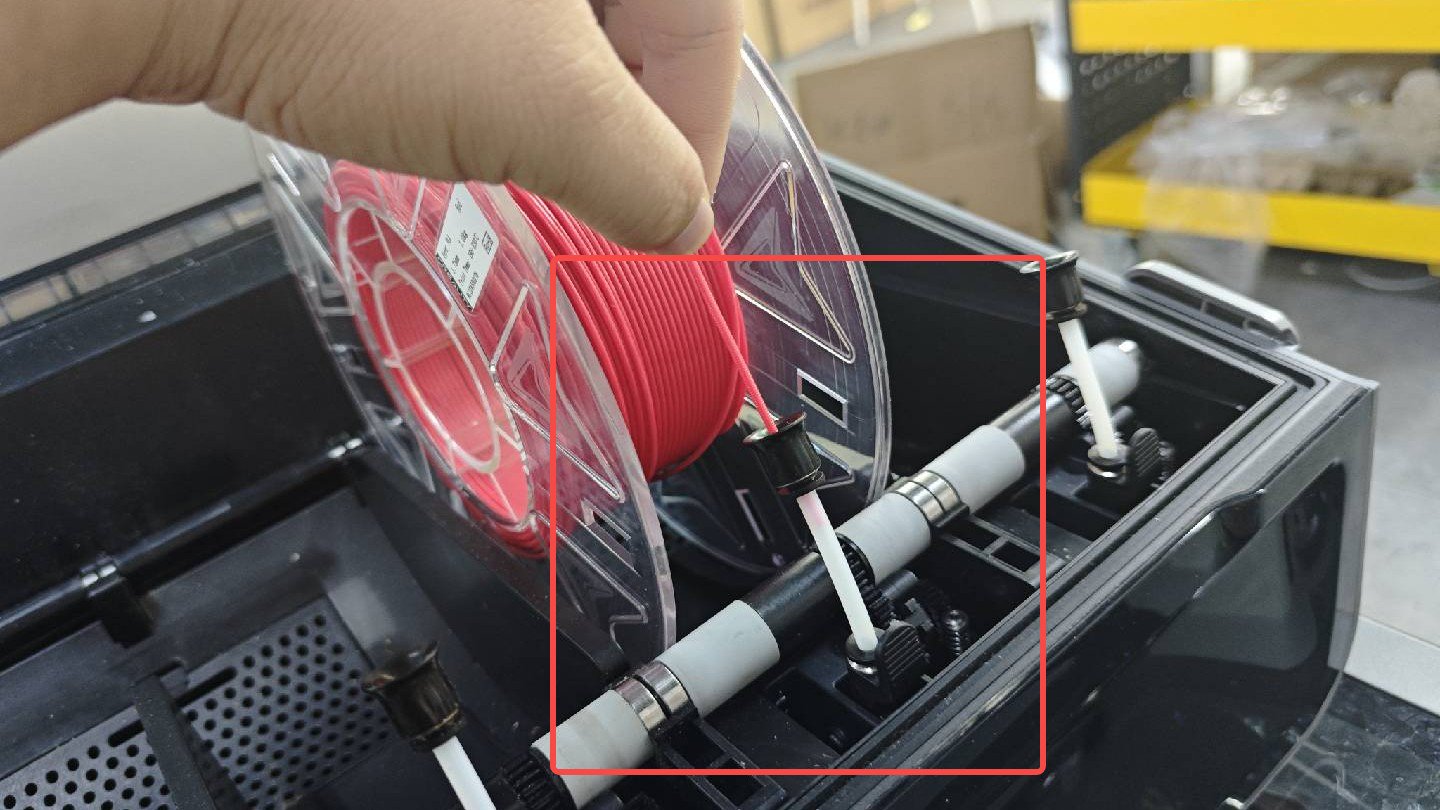
Creality's loading instructions are simple:
- Place the spool in a CFS slot.
- Insert the filament head into that slot's PTFE tube (the white feed tube).
- Push gently until you feel resistance, then let go.
The slot's indicator light comes on and the filament is loaded automatically. You don't need to feed it all the way to the print head yourself.

To remove a spool that isn't in the extruder, pull it straight out of the CFS. If the filament is still in the extruder, tap "Retract" first and wait until it returns to the CFS. When you tap Retract, the nozzle heats up, the print head moves to the front-left to cut the filament, and the CFS then pulls it back. The Extrude and Retract buttons gray out while this happens and light up again when it's finished.
Step 2: Let RFID filament identify itself, or edit the rest
How the printer learns what's in each slot depends on the filament:
- RFID filament. Creality's RFID-tagged spools are read automatically when you insert them, as long as "Insertion Detection" is turned on. The slot shows an eye icon, which means you can view the filament details but not edit them.
- Ordinary (non-RFID) filament. After the CFS tensions the filament, the slot shows a "?" and an edit button. Tap the edit button and set the brand, type, name and color, then tap OK.
One catch is easy to miss. If you swap a non-RFID spool for another non-RFID spool, the screen keeps showing the previous filament's details. Creality says to re-edit the slot every time you change ordinary filament, otherwise the printer will assume the old color and material.
Step 3: Read the filament management screen

The filament page has two parts: the external spool holder on the left and the CFS slots on the right. Slots are numbered by unit and position, such as 1A. Creality's wiki explains each state a slot can show:
| What you see | What it means |
|---|---|
| Pre-feeding button | Tap it to read the filament. If successful, the remaining amount and color appear |
| "/" | Empty slot, cannot be edited |
| Eye icon | RFID filament has been read and can only be viewed |
| Edit button | Ordinary filament that can be edited |
| "?" on an RFID slot | The tag couldn't be read, so edit the details manually |
The screen also shows the CFS humidity status. Green means humidity is appropriate, orange means it's slightly high and red means it's very high. Creality says red probably means it's time to replace the desiccant. Damp filament is a common cause of stringing and weak layers, so it's worth glancing at this before a long print.
Step 4: Check the CFS settings

The CFS settings page has three switches:
- Insertion Detection reads RFID filament when a spool is inserted. Creality notes you can turn it off if you only use ordinary filament.
- Startup Detection reads the RFID spools in turn each time the printer is powered on.
- Automatic Refill switches to a matching spool when one runs out (more on this below).
If you mix RFID and non-RFID filament, leave Insertion Detection on so the RFID spools are read without extra steps.
Step 5: Slice the model with the right printer and filament
Creality's multi-color models site is the easiest place to find files that are already set up for several colors. Download the 3MF file and open it in the slicer, then:
- Change the printer to your exact K2 series model.
- Change the filament to Hyper PLA or another filament profile. Creality specifically warns against keeping the default "Hyper PLA RFID" profile, because slicing with it limits the print speed to 50 mm/s.
- Slice and select the printer, then check that the filament mapping is correct.

When you send the file, the slicer matches each color in the model to a CFS slot. Creality calls this automatic mapping. If you don't like the match it picks, you can choose the slots yourself, which Creality calls manual mapping.
Two limits from the wiki: a printer that is already printing can only receive the G-code file, not start it, and filament mapping isn't available if the printer can't connect to the CFS.
Step 6: Start the print from the screen

You can also start a file from the printer itself. Tap File, check the filament mapping and tap Print. Creality's screenshot of the print screen shows two areas worth checking:
- What the file needs. Each color and filament type the file was sliced with, such as white PLA.
- What the printer will use. The CFS slot mapped to each color. If the exact color isn't loaded, the printer selects another loaded filament automatically. In Creality's example, the file asks for green PLA, none is loaded, and blue PLA is selected instead. If mapping fails, the slot shows "--" and you need to pick one yourself.
Before printing, make sure the colors on the filament page match the spools physically loaded in the CFS. Also make sure the CFS option is enabled. Creality notes that if the CFS is off, the printer uses the external spool holder and treats a multi-color file as a single-color one. The print calibration option runs automatic leveling, AI calibration and other checks before printing starts.
After you tap Print, the CFS loads each filament as needed. You don't have to swap anything by hand.
Step 7: Turn on Automatic Refill for long prints
Automatic Refill means that when one slot runs out of filament, the CFS switches to another slot loaded with filament of the same type and color. This is useful for large single-color prints and for multi-color prints that use a lot of one color.
To set it up, following Creality's refill guide:
- Load the same filament into two or more CFS slots, and make sure each slot is set to the same name and color.
- Open Multicolor Print Settings in the lower left of the filament page.
- Turn on automatic refill. By default, the system selects filament with the same properties and prefers the same color.
- Tap the Auto button to see the refill sequence.

Creality's CFS settings note adds that if the same filament is still in another slot when one runs out, the printer switches automatically and won't stop to ask you for a new spool.
Quick troubleshooting
- Print came out in one color: check that the CFS option was enabled when you started the print.
- Print is unusually slow: check whether the file was sliced with the "Hyper PLA RFID" profile, which Creality says limits speed to 50 mm/s.
- Wrong color printed: re-edit non-RFID slots after every spool change, and recheck the mapping before printing.
- Slot shows "?" with RFID filament: the tag couldn't be read, so edit the details manually.
- Humidity shows red: replace the CFS desiccant.
For a printer that handles multi-color work differently, our Creality K3 review and Creality K3 vs Anycubic Kobra X Combo comparison cover the alternatives. Our Creality shopping guide covers returns and warranty on Creality's US store.
References
- Creality. "Multi-color Printing Guide." Creality Wiki, K2 Flagship Series. https://wiki.creality.com/en/k2-flagship-series/multi-color-printing-guide (accessed November 5, 2026).
- Creality. "Automatic Refill Guide." Creality Wiki, K2 Flagship Series. https://wiki.creality.com/en/k2-flagship-series/automatic-refill-guide (accessed November 5, 2026).
- Creality. "CFS Filament Loading, Unloading and Replacement." Creality Wiki, K2 Flagship Series. https://wiki.creality.com/en/k2-flagship-series/cfs-filament (accessed November 5, 2026).
Meet your guide
Lipeiguan
author
What to read next
 Best Bose Earbuds 2026: QuietComfort Ultra vs QuietComfort vs Ultra Open vs Sport Open vs Wired All five Bose earbuds compared on Bose's published specs and prices, from the $299 QuietComfort Ultra Earbuds (2nd Gen) and Ultra Open Earbuds (2nd Gen) to the $99 Noise Cancelling...
 How to Set Up Bose QuietComfort Ultra Earbuds (2nd Gen): Pairing, Fit, Multipoint and Reset Step-by-step setup for Bose QuietComfort Ultra Earbuds (2nd Gen) from Bose's owner's guide: app and Bluetooth pairing, Fast Pair, eartip and band fit, touch controls, multipoint, c...
 Google Store Cuts Pixel 11 Pro to $799 and Pixel 11 to $699 Through November 8 The U.S. Google Store has the unlocked Pixel 11 Pro at $799 (was $1,099), the Pixel 11 at $699 (was $899) and $350 off the Pixel 11 Pro XL until November 8, 2026 at 11:59 PM PST, p...